MicroPython Air Boat
This project will be made using MicroPython. MicroPython is a lean and efficient implementation of the Python 3 programming language, which includes a small subset of the Python standard library and is optimized to run on microcontrollers.
The goal in this project is to create a MicroPython application that is a standalone WiFi access point and uses a small web server to control the airbot fans.
Hardware
The equipment required for this project are:
- Loron or Cellron Card
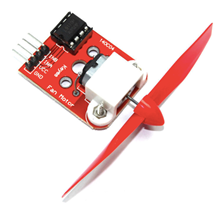
- 2 L9110 Fans
- Use Uno proto shield (optional) or a small breadboard
- 9V battery or portable phone charger
- K-Nex blocks
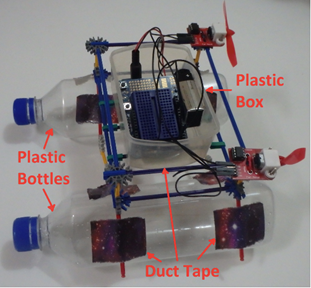
small plastic box - 2 plastic water bottles
- Duct tape
MicroPython is supported on our cards across a range of Wifi connections. You can find the purchasing and technical specification information about our cards in the buy section of our website.
The fans will run at 3.3V but at 5V they produce much more wind power. These fans have four pins: VCC, GND, INA (direction) and INB (on/off). Only forward spinning fans were used for this project, so only pin INB was used.
Boat Building
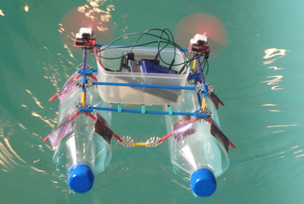
I used K’Nex parts for the boat frame because they are light and sturdy, but there are many other materials that can be used. Water bottles were used for flotation and duct tape was used to fix the bottles to the frame. A small plastic cookie tin was used to help protect the electronics. You have to wrap the fans around the boat frame.
MicroPython Installation
There are several options for MicroPython development. We recommend using Thonny IDE for this project:
The necessary information to download the Thonny IDE is available from the documentation section of our site for Windows and MacOS.
Usually 2 Python applications, a boot.py and a main.py file should be created for MicroPython projects. In this project I put everything in the boot.py file to keep the documentation simple, but for larger projects it is recommended to use main.py.
Creating an Access Point
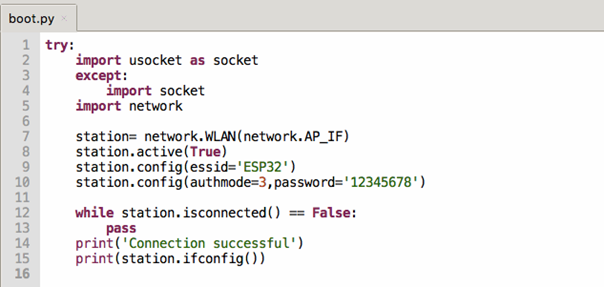
The image below shows how to set up an access point with just a few lines of code. In this example, the name of the access point is “ESP32” and the password is “12345678”. Once the code is run, you will be able to see when a remote user has connected to and disconnected from the access point.
MikroPython Web Server
The next step after running the Access Point is to create a Web server. This is a simple Web server project, so we will embed the HTML content into Python code, but for a more complex application you would definitely need to import my web pages as code-independent files.
We start with the access point connection code for the Web Server sample application, then install a socket on port 80. The HTTP request/response(request/response) array is passed through a function called web_page(request). In web_page(request) the code looks for keywords in the HREF request.
#MicroPython boot.py - Access Point Web Server
try:
    import usocket as socket

    except:

        import socket

    import network

   station= network.WLAN(network.AP_IF)

    station.active(True)

    station.config(essid=’ESP32′)

    station.config(authmode=3,password=’12345678′)

    while station.isconnected() == False:

        pass

    print(‘Connection successful’)

    print(station.ifconfig())

def web_page(request):

    fans_state=””

    if request.find(‘/?forward’)>0:

        fans_state=”Going Forward”

    if request.find(‘/?Stopped’)>0:

        fans_state=”Stopped”

html=”””

Ice Boat Web Server
ICE Boat: “”” +fans_state + “””

>button class=”button”>Forward

>button class=”button button”>STOP

“””

return html

s=socket.socket(socket.AF_INET, socket.SOCK_STREAM)

s.bind((”,80))

s.listen(5)

while True:

    conn,addr = s.accept()

    print(‘Got a connection from %s’ % str(addr))

    request = conn.recv(1024)

    request= str(request)

    print(‘The Content = %s’ % request)

    response = web_page(request)

    conn.send(response)

    conn.close()
Embedded HTML code passes keywords using anchor tags, for example: . We often use mobile frameworks like Bootstrap to aid in formatting, but since we’re running a standalone access point we have to define all our style codes manually.
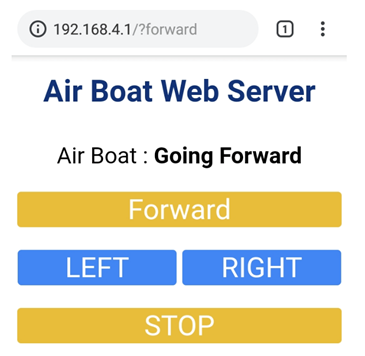
To access our MicroPython web server, use the address: 192.168.4.1. This is the default address (you can change this in the access point setup). We should be able to switch between stop/forward states while our web server is running.
Writing Outputs
The MicroPython command line interface is a good way to test output. Use the connect button to access the command line interface and then enter “Control-C”.
The machine library is used to manage pins in hardware:
from machine import Pin
Then pin objects can be defined as inputs or outputs:
Pin14=Pin(14, Pin.IN)
Pin5 = Pin(5, Pin.OUT)
The value of a pin is read using pinobject.value() and set with pinobject.value (thevalue).
Final Application
Now that all the pieces work independently of each other, we can put them all together. Two fans are defined for the last code (motorR and motorL) and a fan control function is called from web requests.
# MicroPython boot.py - Erişim Noktası Web Sunucusu (Access Point Web Server)

import time

try:

    import usocket as socket

    except:

        import socket

from machine import Pin

import network

#Sol, sağ ve arka fan pinini tanımlayın

motorR = Pin(12,Pin.OUT)

motorL = Pin(4,Pin.OUT)

#Fanlar durdurulmuş olarak başla, Not: FAN'ları 0 da çalıştır

motorR.value(1)

motorL.value(1)

   station= network.WLAN(network.AP_IF)

    station.active(True)

    station.config(essid='ESP32')

 station.config(authmode=3,password='12345678')

   while station.isconnected() == False:

        pass

    print('Connection successful')

    print(station.ifconfig())

   def fancontrol(left,right):

        motorL.value(left)

        motorR.value(right)

   def web_page(request):

    fans_state="Stopped"

    if request.find('/?forward')>0:

        fans_state="Going Forward"

        fancontrol(0,0)

 if request.find('/?left')>0:

        fans_state="Going Left"

        fancontrol(1,0)

         if request.find('/?right')>0:

        fans_state="Going Right"

        fancontrol(0,1)

    if request.find('/?stop')>0:

        fans_state="Stopped"

        fancontrol(1,1)

html="""

Ice Boat Web Server

ICE Boat: """ +fans_state + """

>button class="button">Forward

>button class="button button2">LEFT

>button class="button buuton2">RIGHT

>button class="button button">STOP

"""

return html

s=socket.socket(socket.AF_INET, socket.SOCK_STREAM)

s.bind(('',80))

s.listen(5)

while True:

    conn,addr = s.accept()

    print('Got a connection from %s' % str(addr))

    request = conn.recv(1024)

    request= str(request)

    print('The Content = %s' % request)

    response = web_page(request)

    conn.send(response)

    conn.close()
Summary
You’d be surprised how fast even 2 fans can move the airboat. It may be necessary to balance the direction of the fans or add a simple rudder to keep it in a straight direction.
The same project can be done in Arduino C++ on exactly the same hardware and the response speed is similar. However, the Python code could be a little leaner.
We thank you..

